
Home Assistant on a Raspberry Pi 4B
My first foray into home automation.


As regular readers will recall, I have written previously about smart homes and home automation (also part two) before. The idea of home automation still intrigues me and, as I commented in October 2019 I was looking for a reason to justify playing with this. That idea came when my wife discovered the leak under the kitchen sink, that we thought was fixed, actually turned out to be a second leak - one that had probably been there for months.
I could have just installed a basic humidity sensor in the under sink cupboard but I was after justification to play with Home Assistant and, to my mind, I'd found it. To begin this series of posts I'm going to talk about getting Home Assistant set up on a Raspberry Pi 4.
The hardware
The Raspberry Pi 4B really is a game changer in terms of bang for your buck computing power, so I ordered the 8 GB RAM version to be the host for my Home Assistant instance. This device will be running full time so it's good that the Raspberry Pi draws very little power. I had heard the Pi 4 gets quite hot so I ordered a case with a fan and a large heat sink (the red rectangle in the picture).
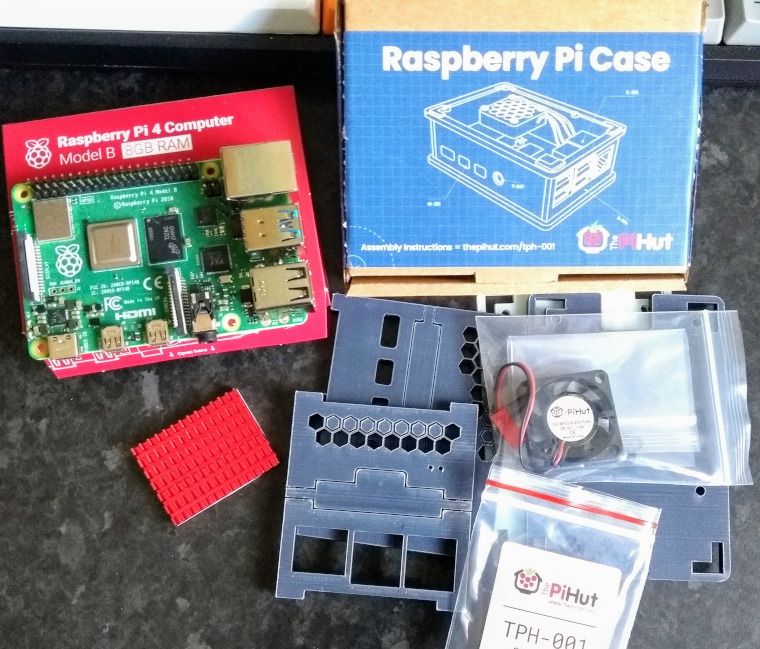
Hats off to The Pi Hut at this point, who delivered my goodies in good time. They also provide very good instructions for assembling the case (the jumble of plastic in the bottom right of the image). It was a bit fiddly getting the case together but I managed it without breaking anything, so happy days!
Installing Home Assistant
In the research I've done previously into roll-your-own home automation, and in a number of tweets from people I respect (e.g. Troy Hunt), Home Assistant was a recurring theme. It seems to be the application of choice and it ticks a lot of boxes for me. Importantly, the data stays on my LAN (unless I choose to publish the instance online) so the risk of data theft is reduced. There's also a lot of articles for Home Assistant and some pretty good documentation so I was able to get going fairly quickly.
I won't discuss the full installation process here as the Home Assistant site does a good job of stepping you through the set up. I'm using the 64-bit image to accompany my Pi's 8 GB RAM. I've also set the instance to run in advanced mode so I can play with everything (even if I don't know what it does yet!).
You can see an example of the Home Assistant dashboard here.
Discovering devices
Once installed Home Assistant promptly detected some of my existing devices, notably my Synology NAS and one of my printers. I've not looked into what mechanism it used to do that but it was quite handy, as now I can see some useful statistics:
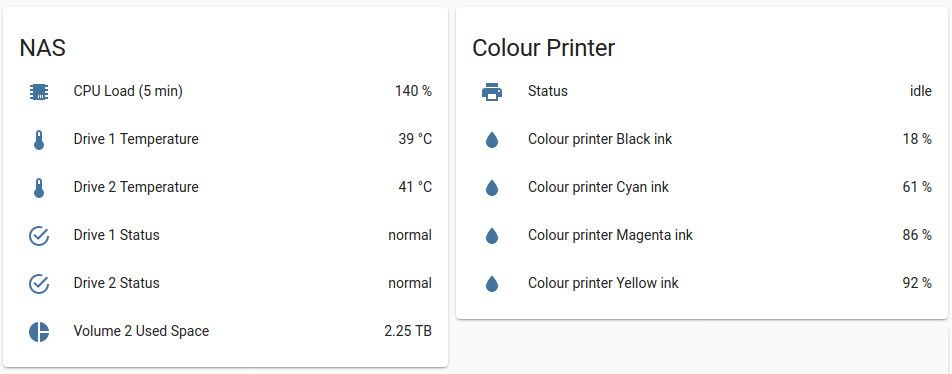
To obtain the information on my NAS I had to provide Home Assistant with some credentials. I'm much happier doing that given I know the data is remaining on my LAN!
Installing add-ons
Home Assistant supports a plethora of add-ons that provide extra functionality. These can be installed via Add-on store in the Supervisor menu. I'm interested in the following add-ons:
- Let's Encrypt
To manage the provisioning of certificates onto my Home Assistant instance - UniFi Controller
My home WiFi is based on UniFi but I have been using a virtual machine for my controller (the controller doesn't need to be on all the time). The plan is to replace the VM with Home Assistant - File editor
This does exactly what the name suggests, and means I can edit the system configuration inside the web browser. Just install it from the add-on store
Configure HTTPS
Installing the Let's Encrypt add-on[1] allows us to obtain a free certificate from Let's Encrypt and stops our browsers complaining about an untrusted certificate. I was keen to have Home Assistant running securely and without browser errors so I installed this early on.
I used DNS verification via a CloudFlare API key in order to verify my ownership of the domain and get the certificate. My next problem was getting Home Assistant to use the certificate I'd obtained. After much digging through forums I was able to find a working configuration that goes inside your configuration.yaml. I'll explain how you can edit that in the browser later in this post, but the key information I was missing was where the SSL certificate was located (/ssl/). The relevant part of my configuration looks like this:
http:
  ssl_certificate: '/ssl/fullchain.pem'
ssl_key: '/ssl/privkey.pem'The port Home Assistant runs on does not change once you add the certificate to make it HTTPS, so by default it remains on port 8123 (e.g. https://ha.example.org:8123). You can change that by adding further options to the http section.
You'll want to have the Let's Encrypt add-on start on boot so that it can renew your certificate if necessary.
Setting up the UniFi Controller
While browsing the Add-on store I'd spotted this and immediately wanted to add this to my set up. Simply install the add-on and then tell it to start. If you're not running Home Assistant over HTTPS, or you've not given Home Assistant a certificate, you'll need to edit the add-on's configuration to tell it not to use SSL (change line 1, below, to say false):
ssl: true
certfile: fullchain.pem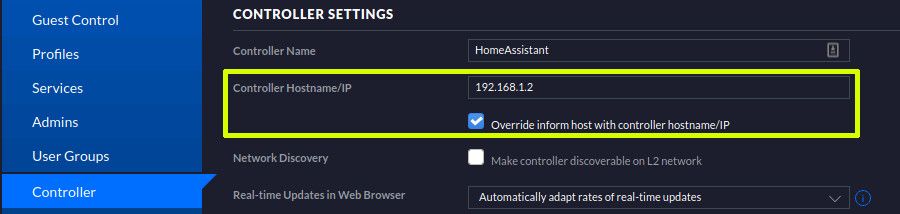
keyfile: privkey.pemDuring set up of my new UniFi controller I restored a backup from my old one and then told my access point to register (inform) with the new controller on Home Assistant. In order for this to work you have to change a setting in the UniFi controller to override the IP address it uses[2]. This is done via Settings > Controller. You'll need to set the controller hostname/IP to the IP address of your Home Assistant instance and then ticket the box to override inform host with controller hostname/IP.
What next?
Now I've got a basic Home Assistant instance running it's time to have a play and get used to what this system can do. I'm interested to put some power saving automations in place, for example to power down the media PC overnight (some of my family leave it on!). In time perhaps I can put a button in the living room to power on the media PC, projector and amplifier / speakers (I think that's done with scenes). The keen eyed among you will have spotted I've already started some work on that.
Next though I'll look at setting up a Raspberry Pi Zero W under the sink so I can monitor humidity and spot leaks early. I'll write another post on that in due course...
Banner image: A screenshot from my instance.
[1] Note there is another add-on called DuckDNS that also allows you to obtain a Let's Encrypt certificate. I didn't need the extra functionality.
[2] By the looks of it the various Home Assistant components run within Docker, so the container's IP wouldn't be available to my LAN or the access point.